How to Assign Templates
Assigning Templates via Per User Configuration
The Per User Configuration contains a variety of settings that control changes made site wide for the active user. Please note that changes made to the Per User settings are valid only for the individual user and never for all users.
Assigning Templates for Generated Pages via Per User Configuration
- Log in to the Control Panel. Click the Settings tab.

- Locate the Store Settings section. Click the Configure Per User icon (
 ). You will be transferred to the Configure Per User screen.
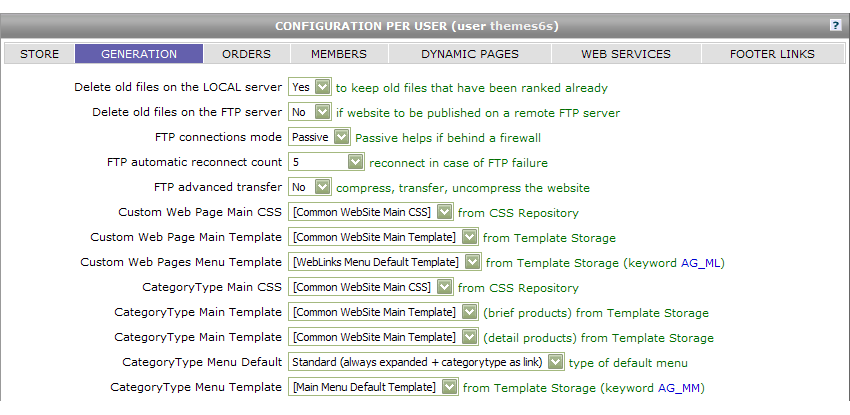
- Click the Generation tab (
 ). Under this section, you will find a variety of settings for Templates. Here, you can assign templates for:
- Custom Web Page Main Template from Template Storage
- Custom Web Pages Menu Template from Template Storage
- CategoryType Main Template (brief products) from Template Storage
- CategoryType Main Template (detail products) from Template Storage
- CategoryType Menu Template from Template Storage
- CategoryType: Manufacturer Template from Template Storage
- CategoryType: Category Template from Template Storage
- CategoryType: Product Template from Template Storage
- CategoryType: Related Product Template from Template Storage
- Select all desired templates from the corresponding dropdown. When finished, click the Update button (
 ) at the bottom of the screen. If you do NOT click Update, your changes will not be applied to your website.
Assigning Order-Related Templates via Per User Configuration
- Log in to the Control Panel. Click the Settings tab.
- Locate the Store Settings section. Click the Configure Per User icon ( ). You will be transferred to the Configure Per User screen.
- Click the Orders tab (
 ). You will be transferred to the Per User - Orders screen.
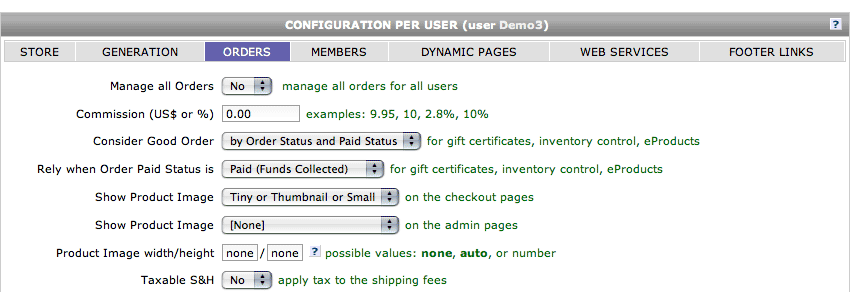
Under this section, you will find a variety of settings for Templates. Here, you can assign templates for:
- Email Confirmation Template from Template Storage
- Email Drop Shipping Template from Template Storage
- Email GiftCert Template from Template Storage
- Email GiftCard Template from Template Storage
- Select all desired templates from the corresponding dropdown. When finished, click the Update button ( ) at the bottom of the screen. If you do NOT click Update, your changes will not be applied to your website.
Assigning Templates for Dynamic Pages via Per User Configuration
- Log in to the Control Panel. Click the Settings tab.
- Locate the Store Settings section. Click the Configure Per User icon ( ). You will be transferred to the Configure Per User screen.
- Click the Dynamic Pages tab (
 ). You will be transferred to the Per User - Dynamic Pages screen.
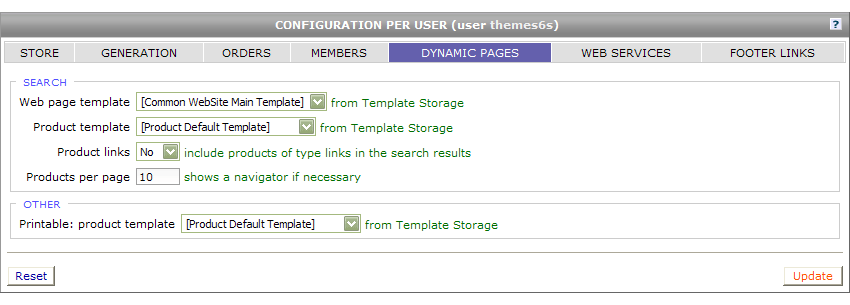
Under this section, you will find a variety of settings for Templates. Here, you can assign templates related to your store's search pages. Here you may specify the Website Main Template that is to be used on your search pages as well as the Product Template that will be used to display search results. You may also select the Product Printable View Template in this section.
- Select all desired templates from the corresponding dropdown. When finished, click the Update button ( ) at the bottom of the screen. If you do NOT click Update, your changes will not be applied to your website.
Assigning Templates to Individual Category Types, Categories, and Subcategories
In addition to setting templates to be applied to your online store site wide, you may also specify individual templates for Category Types, Categories, and Subcategories. Please note that if you assign a template to a Category Type or Category, then the change will automatically apply to any child elements.
The procedure for assigning an individual template to a Category Type, Category, or Subcategory is very similar and is as follows:
- Log in to the Control Panel. Click the Products tab.

- Locate the Store Structure section. Click the Category Types icon (
 ) if you wish to assign a template to a Category Type, or the Category icon (
  ) if you wish to assign a template to a Category or Subcategory. You will be transferred to the corresponding screen.
- Click the Edit link that corresponds with the Category Type, Category, or Subcategory to which you wish to assign your template. You will be transferred to the corresponding table.
- Inside each Category Type, Category, and Subcategory, beneath the AUTO_GENERATED_CONTENT boxes, you will find settings for the following types of templates:
- Web Page Template (brief products) : This allows you to set a specific Main Template to apply to the product's brief pages only.
- Web Page Template (detail products) : This allows you to set a specific Main Template to apply to the products detail pages only.
- Product Template : This allows you to assign an individual or specialized Product Template to a Category Type, Category, or Subcategory.
- Related Product Template : This allows you to assign an individual or specialized Related Product Template to a Category Type, Category, or Subcategory.
- Select all desired templates from the corresponding dropdown. When finished, click the Save button (
 ) at the bottom of the screen. If you do NOT click Save, your changes will not be applied to your website.
Assigning Templates to Product Groups
Because Product Groups have a variety of specialized usage, you may assign them an individual Product Template to set them apart from other Products in your online store. To do so, you should:
- Log in to the Control Panel. Click the Products tab.
- Locate the Product Associations section. Click the Product Groups icon (
 ). You will be transferred to the Product Groups screen.

- Click the Edit link that corresponds with the Product Group to which you wish to assign your template. You will be transferred to the corresponding table.
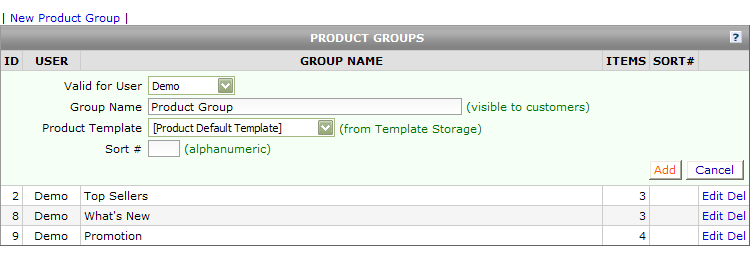
- Select the desired template from the Product Template dropdown selection tool.
- Click the Save button ( ). If you do NOT click Save, your changes will not be applied to your website.